Shooting with the Camera Only
This section explains basic methods for performing shooting.
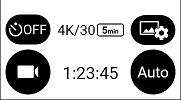
1Tap the shooting mode button on the shooting screen of the camera to select the shooting mode.
Select the shooting mode from the still image shooting mode, video shooting mode, and live streaming mode (only when the camera is connected to a computer with a USB cable).
Still images

Videos
Displaying the Shooting Screen and Various Other Screens
The mode button on the side of the camera can also be used to select the shooting mode.
2. Set the exposure program, shooting conditions (shooting parameters and shooting settings), whether to use the self-timer, etc.
Checking and Changing the Shooting Conditions
3. Position the camera.
The vertical tilt is corrected regardless of the direction of the camera. However, if you want to record the azimuth orientation correctly, position the camera vertically as much as possible.
4. Press the shutter button.
You can also perform shooting using the touch shutter function.some text
Checking and Changing the Camera Settings: Touch shutter function
When the shutter button is pressed, a response sound is heard, and the shutter sound is heard at the start of shooting.
Caution
- Azimuth orientation information may not be recorded correctly if the camera is tilted or a magnetic item such as a magnet is placed near the camera when shooting.
- If the battery level drops below a certain level while shooting a video, shooting is forcibly stopped.
- For [4K] (30 fps) video shooting with the wireless LAN function set to on, you cannot start shooting if the battery level is below a certain level. Charge the battery or turn off the wireless LAN function before starting shooting.
- If the temperature inside the camera rises, shooting is forcibly stopped for safety.
Note
- Still images and videos shot with the camera can be checked and deleted on the playback screen of the camera. They can also be played back on a smartphone or computer. However, when the memory card is inserted in the camera, the still images and videos in the internal memory cannot be played back.
- Videos may not be transfered to a smartphone or played back on a smartphone or computer depending on the video size.
- When the remaining number of still images that can be shot is small, delete still images and videos in the internal memory or memory card or transfer them to a smartphone or computer.
- The LCD panel and all lamps turn off during exposure.
- The camera automatically enters the power saving mode if no operations are performed for a set period of time. (The power saving mode can also be disabled in the settings.) If you tap on the LCD panel in the power saving mode, the camera returns to the shooting enabled state. You can also perform shooting directly from the power saving mode by pressing the shutter button.
- The camera automatically enters the sleep mode if no operations are performed for a set period of time (default setting: 3 minutes). (The sleep mode can also be disabled in the settings.) Shooting is not possible in the sleep mode. Press the power button to cancel the sleep mode, and then press the shutter button to perform shooting.