Startup Guide Steps

Prepare
Install the RICOH360 app
Install the RICOH360 app for smartphones


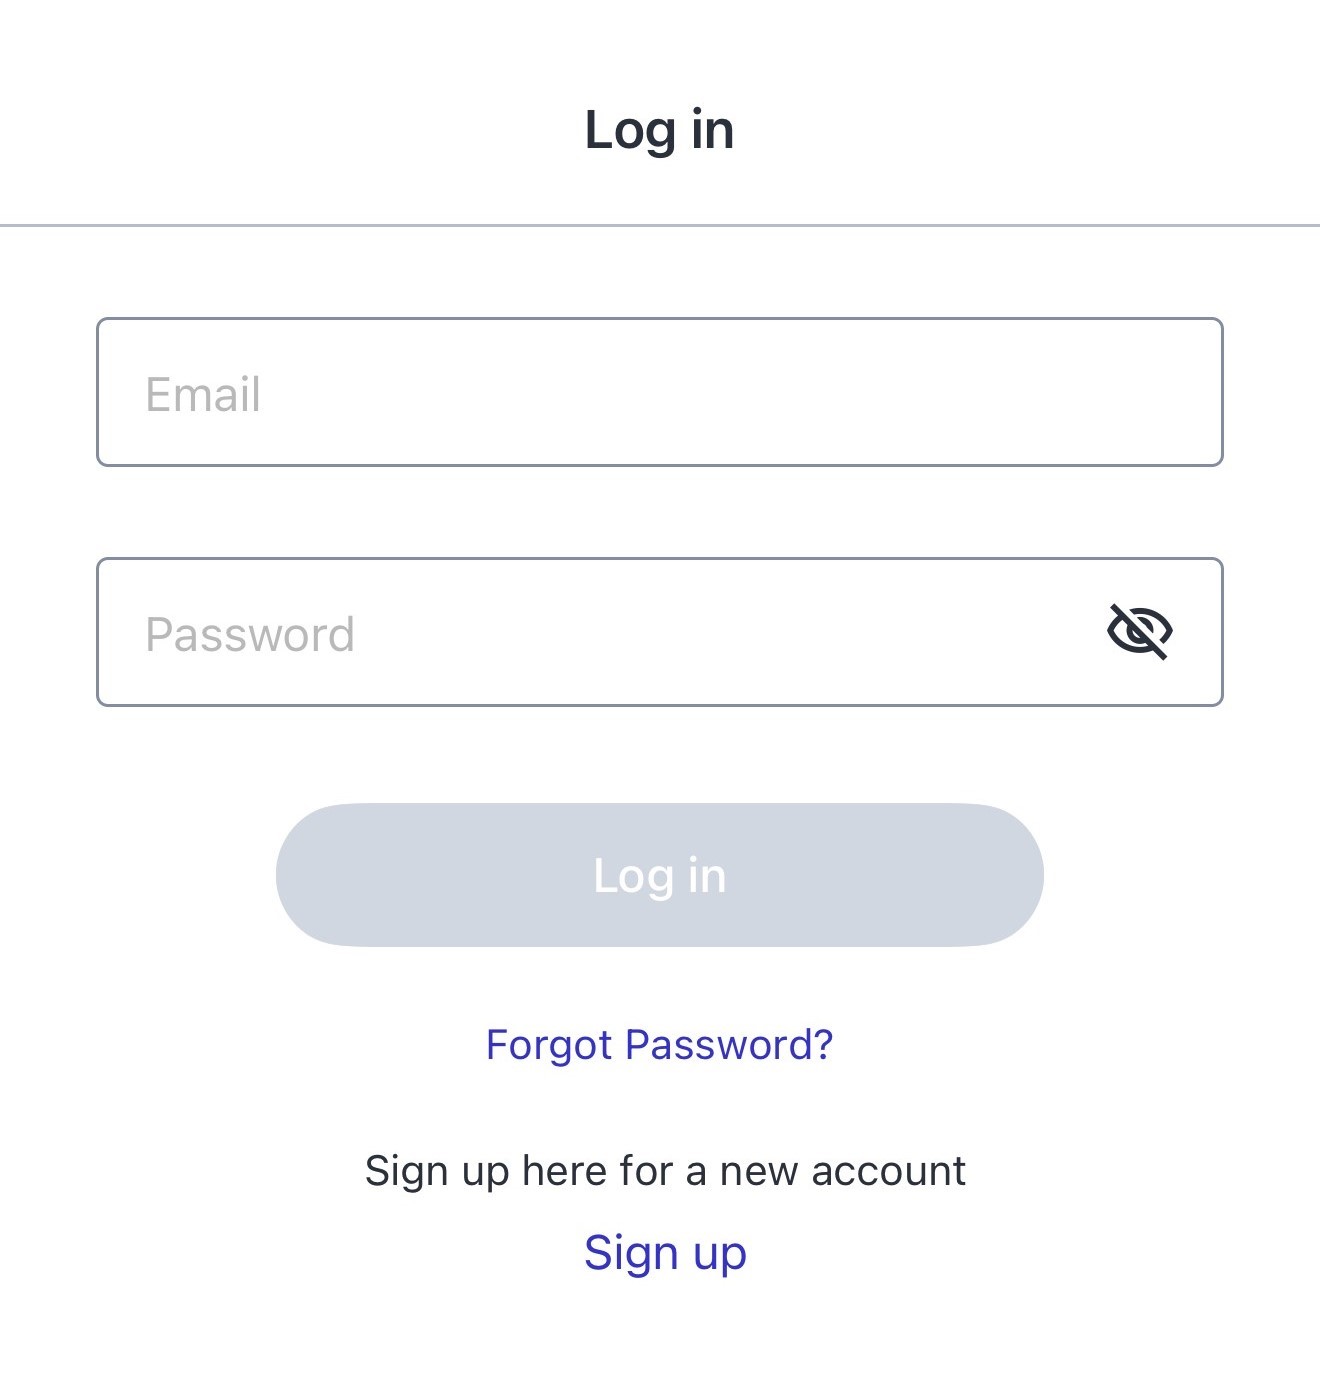
Sign up for a RICOH 360 account
To use RICOH360, you first need to sign up for a RICOH360 account.
* Accounts created with RICOH 360 can also be used with RICOH360 Tours.
Also, accounts created with RICOH 360 Tours can also be used with RICOH360, so if you have already created an account with RICOH360 Tours, there is no need to create an account here.
* When using the service, please read and agree to the Terms of Use and Privacy Policy. If you do not agree, you cannot use this service. Please understand in advance.
Signing up for an account on a PC
- Open the account creation page in your browser
- Enter your Email address and Password
- Read the Terms of Use and Privacy Policy, and check the box
- Click the Create Account button
Signing up for an account on a smartphone
- Go to the RICOH360 App Download page, install the app, and Create a new account
Checking the Package
When opening the package, check that the following items are included:
RICOH THETA X

USB cable

Rechargeable battery (DB-110)

Soft case

Quick Start Guide
Important Message to Customers
Names of Camera Parts
This section explains the names and functions of the buttons, lamps, etc. on the camera.

1. Speaker
2. Battery/card cover
3. Rear lens
Caution
Be careful when handling the lens section to avoid damage.
4. LCD panel
Displays the menu, shooting information, and shot images. Touch operation is possible on this panel.
Displaying the Shooting Screen and Various Other Screens
5. Shutter button
Shoots a still image or video when pressed.
6. Tripod mount hole
UNC 1/4-20 (compliant with JIS B 7103), depth: 6.7 mm
Caution
When using a tripod, take care not to overtighten its screw. If you use a tripod with a different screw standard, the camera may be damaged.
7. Power lamp
Indicates the power status.
Lit in blue: The power is on.
Lit in green: The battery is being charged via a USB cable.
Flashing in red: The power is turning off.
Unlit: Charging is complete, the camera is in the sleep mode or light/sound off mode, or the power is off.
8. Power button
Turns the power on and off when pressed and held.
Puts the camera to the sleep mode or cancels the sleep mode when pressed briefly.
9. Mode button
Switches the shooting mode between the still image shooting mode, video shooting mode, live streaming mode (only when the camera is connected to a computer with a USB cable), and My Settings mode (only when the settings are registered).
Runs the last used plug-in when pressed and held.
Operating Plug-ins with the Camera
10. USB terminal (USB Type-C)
Connects with a computer via the provided USB cable.
Caution
When a USB cable other than the provided USB cable is used, it may take time for the battery to charge, or charging or data communication may not be possible.
11. Front lens
Caution
Be careful when handling the lens section to avoid damage.
12. Microphone
13. Camera status lamp
Indicates the camera status.
Lit in blue: Shooting is possible.。
Flashing in red: An error has occurred in the camera.
Lit in green: The self-timer or Time Shift function is turned on.
Unlit: A still image or video is being shot, or the camera is in the sleep mode or light/sound off mode. Or the camera is in a state where shooting is not possible as no more images can be shot, or no more recordable time remains.
Setting the Battery and Memory Card
Set the provided rechargeable battery to the camera.
When using a memory card, set a commercially available microSDXC memory card (64 GB or more; compatible with the UHS-I interface and Video Speed Class V30).
- Check that the power of the camera is off.
- Slide the battery/card cover in the direction of the arrow to open it.

- Check that the orientation of the battery is correct, and insert it all the way while pushing the latch sideways.

To remove the battery, slide the latch.
- When using a memory card, check that the orientation of the memory card is correct, and insert it.
- Close the battery/card cover.
Charging the Battery
The battery must be charged before using the camera.
- Connect the camera to a computer using the provided USB cable to charge the battery.

The power lamp lights green when charging starts.
The power lamp turns off when charging is complete.
- Remove the USB cable after charging is complete.
Charging Time
The battery is charged in approx. 170 minutes (at an ambient temperature of 25°C (77°F)).
Caution
- Use the provided USB cable for charging. When a USB cable other than the provided USB cable is used, it may take time for the battery to charge, or charging or data communication may not be possible.
- Connect the cable directly to a USB port on the computer. Do not connect the cable via a USB hub. It may not be possible to charge via some USB hubs.
- When charging, be sure to insert and remove the USB cable while the power of the computer is on. If the computer is restarted while the USB cable is inserted, the computer may not recognize the camera.
Note
- The battery level can be checked on the LCD panel.
- The power lamp lights green during charging. The power lamp lights blue when charging is complete while the power of the camera is on. The power lamp turns off when charging is complete while the power of the camera is off or the camera is in the sleep mode.
- The charging time described above is a guide for full charging. The charging time varies according to the remaining battery level.
- If the remaining battery level is low, it may take time for the camera to be recognized by the computer.
- When turning the camera on without using the battery, it is recommended to use the AC Adapter Kit K-AC166 (sold separately; the model name varies depending on the country).
If the power adapter output is insufficient, the message “Incorrect power supply is used.” is displayed.
When Using a Memory Card
When using a new memory card or memory card used with another device, the card must be formatted on this camera.
Note
When using a memory card, shot images are saved only in the memory card. Also, only the images saved in the memory card can be played back. If you want to save shot images in the internal memory or play back the images in the internal memory, remove the memory card when the power of the camera is off.
The images and videos saved in the internal memory can be transferred to the memory card by executing [Transfer file] on the camera setting screen.
Checking and Changing the Camera Settings
If there are many images and videos saved in the memory card,
flashes on the shooting screen until the camera recognizes the memory card. If you perform shooting before the memory card is recognized, shot images will be saved in the internal memory. On the thumbnail list screen (playback screen) while the camera is recognizing the memory card, an animation indicating that the recognition process is in progress is displayed in the top right area.
Turning the Power On/Off
When charging of the battery is complete, turn on the power of the camera.
- Press and hold the power button.

- The LCD panel turns on.

- Press and hold the power button again to turn off the power.
- You can put the camera to the sleep mode or cancel the sleep mode by pressing the power button briefly.
- The power lamp color indicates the camera power status.
Names of Camera Parts: Power lamp
Note
For the firmware version 2.40.0 or later, disconnecting the USB cable during the sleep mode will cancel the sleep mode.
Making Initial Settings
When the power of the camera is turned on for the first time, the initial setting screen is displayed. Follow the instructions on the screen to make the initial settings.
- Select your language, and then tap [NEXT].

- Select whether to turn on the position information addition function, and then tap [NEXT].

- Tap [START] to start the tutorial.
- Set the date and time according to the on-screen instructions.

The “shooting and playback” and “connection to smartphone app” tutorials are displayed in succession.
Note
- The settings made on the initial setting screen can be changed later on the camera setting screen.
- The “connection to smartphone app” tutorial can be watched later on the camera setting screen.
Checking and Changing the Camera Settings
Caution
The “shooting and playback” tutorial is only displayed the first time the power of the camera is turned on. Note that if you cancel the tutorial in the middle or if the camera enters the sleep mode or is turned off during the tutorial, the tutorial is considered over.
Displaying the Shooting Screen and Various Other Screens
When the power of the camera is turned on and the initial settings are complete, the shooting screen is displayed on the LCD panel. You can display various screens by swiping left, right, up, and down on the shooting screen.
Information Displayed on the Shooting Screen
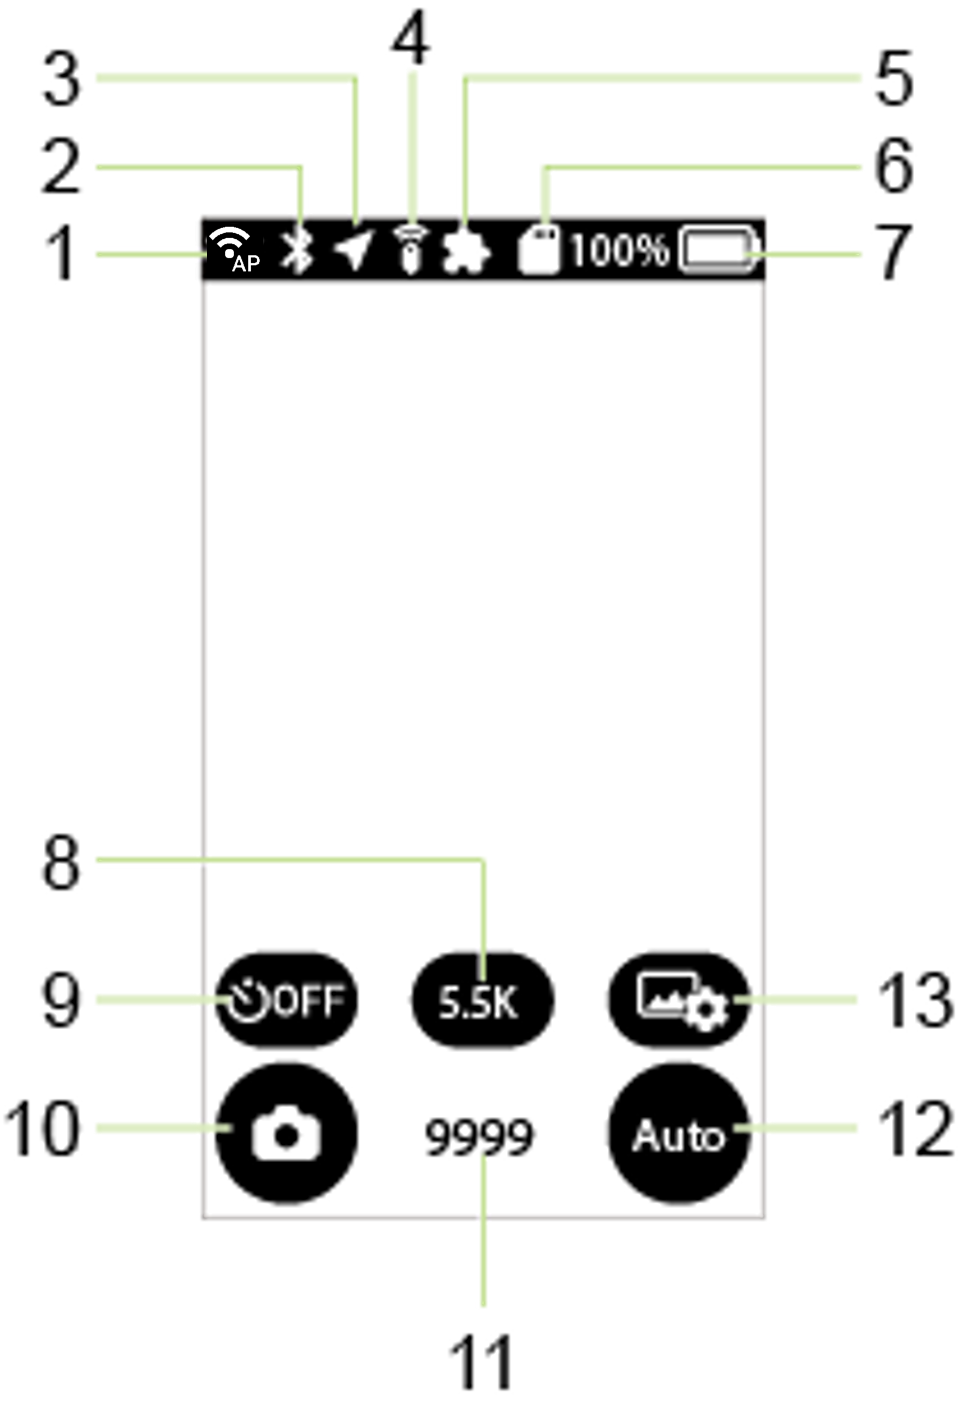
Communication status

The wireless LAN function is on in the access point mode.
The wireless LAN function is on in the client mode.
A USB-Ethernet adapter is used.
After connecting to the cloud via the app “RICOH360”:

The camera is in the access point mode or not connected to ricoh360.com. (There are images in the camera waiting to be uploaded.)

The camera is in the access point mode or not connected to ricoh360.com. (There are no images in the camera waiting to be uploaded.)

The camera is connected to ricoh360.com in the client mode and on standby. (There are no images in the camera waiting to be uploaded.)

The camera is connected to ricoh360.com in the client mode and uploading images.

The camera is connected to ricoh360.com in the client mode and on standby. (The cloud storage capacity for the account used has reached its limit and there are images in the camera waiting to be uploaded.)
Bluetooth®/TM function
Bluetooth®/TM function is on.
Position information addition function
The position information addition function is on.
The position information addition function is on but the position information has not been acquired yet.
Remote control
The Remote Control TR-1 (sold separately) is connected.
Plug-in
A plug-in is running.
Memory card
A memory card is inserted. (The icon flashes until the camera recognizes the memory card.)
A memory card error has occurred.
Battery level
to
Battery level (100% to 0%)
The battery is charging.
Power is being supplied without the battery.
Image size / Video size and maximum recordable time
In the still image shooting mode, the image size is displayed. You can switch image sizes by tapping the button.
In the video shooting mode, the video size and maximum recordable time are displayed.
Self-timer
Tap the button to turn the self-timer function on and off.

The self-timer function is off.

The self-timer function is on. (The number of countdown seconds is displayed on the button.)
Checking and Changing the Shooting Conditions
Shooting mode
Tap the button to display the shooting mode selection screen.
Select the shooting mode from the still image shooting mode, video shooting mode, and live streaming mode (only when the camera is connected to a computer with a USB cable).

Still image shooting mode

Video shooting mode

Live streaming mode (only when the camera is connected to a computer with a USB cable)
Note
You can also switch the shooting mode by pressing the mode button on the side of the camera.
Number of recordable still images / Video recordable time
Note
The number of recordable still images and video recordable time are guides only.
The maximum number of recordable still images that can be displayed is “9999”. Even when the number of recordable still images is more than 9999, it is displayed as “9999”.
Exposure program
Tap the button to display the exposure program selection screen.
Select the exposure program from Auto, Shutter priority, ISO priority, Manual, and My Settings (only when the settings are registered).

Auto

Shutter priority

ISO priority

Manual

My Settings (displayed above the exposure program button only when the settings are registered). If you change the shooting conditions after selecting My Settings, the icon changes to

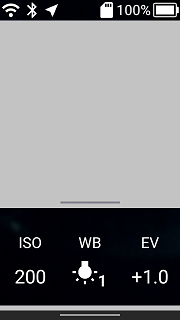
Shooting settings

Tap the button to display the shooting setting screen.
Others

The electronic compass is malfunctioning and the azimuth orientation cannot be obtained correctly. With the camera turned on, move the camera as if drawing ∞ (infinity symbol).

The temperature of the camera has risen. Do not keep touching the camera. If the temperature continues to rise, the camera will be forcibly stopped for safety.
Note
You can change the Live View display area by swiping on the Live View image displayed on the shooting screen.
Touch and hold the center of the screen to hide the shooting information and display only the Live View image. Touch and hold the screen again to redisplay the shooting information. When the touch shutter function is on, you cannot hide the shooting information by touching and holding the screen.Checking and Changing the Camera Settings: Touch shutter function
Switching to Various Other Screens
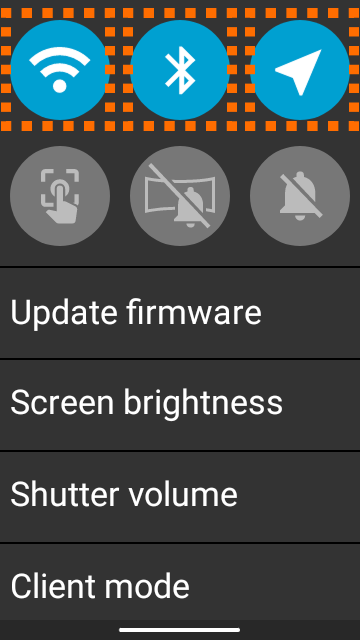
Swipe from the edge of the LCD panel while the shooting screen is displayed to switch to various other screens.

- Camera setting screen
- Playback screen
- Shooting parameter setting screen
- Plug-in selection screen
Swiping down: Camera setting screen

Checking and Changing the Camera Settings
Swiping right: Playback screen (thumbnail display)

Swiping up: Shooting parameter setting screen
Swiping up again: [Shooting settings] screen

Checking and Changing the Shooting Conditions
Swiping left: Plug-in selection screen

Operating Plug-ins with the Camera
You can return from each screen to the shooting screen by swiping the bar at the screen edge toward the center or pressing the shutter button. However, when the shutter button is pressed on the shooting parameter setting screen, shooting is performed without returning to the shooting screen.
Link your smartphone and camera with the RICOH360 app
By connecting your smartphone to your camera, you can control your camera from your smartphone.
1. Turn on the THETA X
2. Swipe down from the top of the THETA X display panel, and tap the icons for the wireless LAN, Bluetooth® function and location information to turn them on (blue).
3. Open the RICOH360 app, log in, and tap [THETA List] at the bottom of the screen.
4. Tap [New Camera].
5. Tap [RICOH THETA X].


6. When ‘RICOH THETA has been discovered.’ appears, tap [Connect]

7. Enter your Password and tap [Connect].

8. When the dialog box appears, tap [Join] and wait for a moment.

9. When the completion screen appears, pairing between the THETA X and your smartphone is complete.

To take a photo with the linked camera, tap [Start Capturing].
You can also use RICOH360 Cloud to automatically upload photos.
Unregistering the Camera from the Smartphone
This operation cannot be performed while the smartphone is connected to THETA.
1. Start the RICOH360 app.
2. Tap [THETA List] at the bottom of the screen.
3. Select the camera you want to unregister from the camera list.
4. Tap the trash can icon in the upper right corner.

5. Tap [Delete].
