Startup Guide Steps

Prepare
Install the RICOH360 app
Install the RICOH360 app for smartphones


Sign up for a RICOH360 account
To use RICOH360, you first need to sign up for a RICOH360 account.
* Accounts created with RICOH 360 can also be used with RICOH360 Tours.
Also, accounts created with RICOH 360 Tours can also be used with RICOH360, so if you have already created an account with RICOH360 Tours, there is no need to create an account here.
* When using the service, please read and agree to the Terms of Use and Privacy Policy. If you do not agree, you cannot use this service. Please understand in advance.
Signing up for an account on a PC
- Open the account creation page in your browser
- Enter your Email address and Password
- Read the Terms of Use and Privacy Policy, and check the box
- Click the Create Account button
Signing up for an account on a smartphone
- Go to the RICOH360 App Download page, install the app, and Create a new account

Checking the Included Items
Check that the following items are included in the package.
RICOH360 THETA A1
USB cable

Rechargeable Battery TB-1

Soft case

Strap

Quick Start Guide
Important Message to Customers
Names of Camera Parts
This section explains the names and functions of the buttons, lamps, etc. on the camera.
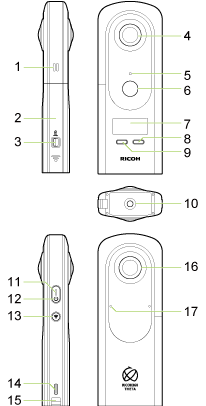
1. Speaker
2. Battery cover
3. Lock lever
4. Rear lens
Caution
- The provided soft case is designed to protect the lenses. If another case is used, be careful not to scratch the lenses.
5. Camera status lamp
Lights when shooting is possible.
Some lighting statuses show that it is not possible to shoot. Refer to the following and check the status of the camera.
Lit in blue: Shooting is possible.
Flashing in blue: The camera is starting up.
Flashing in red: An error has occurred in the camera. The lamp also flashes in red during the power-off process of the camera.
Lit in green: The self-timer function can be used for shooting.
Flashing in green: The self-timer is in operation or the Time Shift shooting function is turned on.
Unlit: Shooting is not possible as the camera is in the sleep mode, no more images can be captured, or no more recordable time remains. The lamp is also unlit during shooting.
6. Shutter button
Shoots a still image or video when pressed.
In the video shooting mode, press this button at the start and end of shooting.
7. OLED panel
Displays the shooting information, battery level, etc.
8. Fn button
In the still image shooting mode or video shooting mode: Switches the shooting function between the normal shooting and the self-timer shooting.
On the selection screen: Functions as the “OK” button.
9. Mode button
Switches the shooting mode between the still image shooting mode and the video shooting mode.
On the selection screen: Functions as the “Cancel” button.
10. Tripod mount hole
UNC 1/4-20 (compliant with JIS B 7103), depth: 6.7 mm
Caution
- When using a tripod, take care not to overtighten its screw.
11. Power lamp
Indicates the power status.
Lit in blue: The power is on.
Lit in green: The battery is being charged via a USB cable.
Flashing in green: The battery cannot be charged via a USB cable. (This includes when a USB cable is connected without the battery in the camera.)
Flashing in red: The power is turning off. The lamp also flashes when the camera is too hot.
Unlit: Charging is complete, the camera is in the sleep mode, or the power is off.
12. Power button
Turns the power on and off or puts the camera to the sleep mode.
When pressed while the power is off: Turns the power on.
When pressed while the power is on: Puts the camera to the sleep mode.
When pressed in the sleep mode: Cancels the sleep mode.
When pressed and held for 2 seconds while the power is on: Turns the power off.
When pressed and held for 7 seconds while the power is on: Turns the power off forcibly.
13. Wireless button
Switches the wireless LAN function between the client mode, the access point mode, and off when pressed briefly.
Turns the Bluetooth® function on and off when pressed and held.
14. USB terminal (USB Type-C®)
Used to connect the camera to a computer via the provided USB cable to charge the battery.
Caution
- It may take time for the battery to charge or the battery may not charge at all when a USB cable other than the provided USB cable is used.
- If the battery is charged while the power of the camera is on, charging time is longer.
15. Strap lug
16. Front lens
Caution
- The provided soft case is designed to protect the lenses. If another case is used, be careful not to scratch the lenses.
Information displayed on the OLED panel
The OLED panel displays the following information.

1. Bluetooth®

The Bluetooth® Classic function is on.

The camera is connected to a device with Bluetooth® Classic.
Note
- Even when the camera is in the sleep mode, it emits radio waves with Bluetooth®.
2. Wireless LAN communication status

The wireless LAN function is on in the client mode. The icon flashes while searching for devices.

The wireless LAN function is on in the access point mode. The icon flashes while searching for devices.

A USB-Ethernet adapter is used.
3. Cloud connection status with the RICOH360 app

The camera is in the access point mode or not connected to ricoh360.com. (There are images waiting to be uploaded.)

The camera is in the access point mode or not connected to ricoh360.com. (There are no images waiting to be uploaded.)

The camera is connected to ricoh360.com in the client mode and on standby. (There are no images waiting to be uploaded.)

The camera is connected to ricoh360.com in the client mode and uploading images.

The camera is connected to ricoh360.com in the client mode and on standby. (The cloud storage capacity for the account used has reached its limit and there are images waiting to be uploaded.)
4. Mobile communication

The camera is in mobile communication.
Signal strength 4 to 1, 0

5. Position information addition status

The position information addition function is on.

The position information addition function is on but the position information has not been acquired yet.
Note
- When the camera retains A-GPS data, the icon is marked with a square frame. To shorten the time required to acquire position information, A-GPS data is automatically downloaded while the camera is connected to the Internet.
- If an electronic compass error is detected,

is displayed.
6. Battery level

Battery level (100% to 0%)

The battery is charging.

The camera is operating without the battery.

The battery temperature is abnormal.
7. Shooting mode / Shooting mode option

Still image shooting mode

Video shooting mode

During video shooting (the icon flashes)

Self-timer shooting function set to on

During interval shooting (for still images)*

During Time Shift shooting (1|2 / 2|2)*
* Displayed when using the RICOH360 app.
8. Self-timer
9. Number of recordable still images / Video recordable time / Self-timer countdown
Attaching the Strap
Attach the provided strap to the camera.
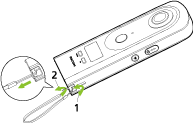
1. Pass the thin part of the strap through the strap lug on the camera.
2. Pass the other end of the strap through the loop of the thin part, and then tighten it.
Setting the Battery
Set the provided rechargeable battery to the camera.
1. Slide the lock lever on the battery cover in the direction of the arrow to release the lock, and then slide the battery cover in the direction of the arrow to open it.
When the lock is released, you can see the yellow indicator.
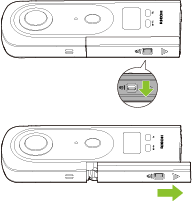
2. Check that the orientation of the battery is correct, and insert it all the way while pushing the latch sideways.
To remove the battery, slide the latch.
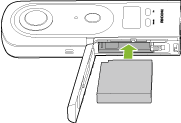
3. Close the battery cover and slide the lock lever to lock the cover.
Caution
- When opening or closing the battery cover, be sure to remove any water, sand, or other dirt from the camera and avoid places where dirt can easily get in.
- Close the battery cover securely. Otherwise, water or dust may get inside the camera.
- When inserting or removing the battery, make sure that the power of the camera is off.
- Do not insert or remove the battery while power is supplied to the camera via the AC adapter.
Charging the battery
Charge the battery before using the camera.
1. Connect the camera to a computer with the provided USB cable.
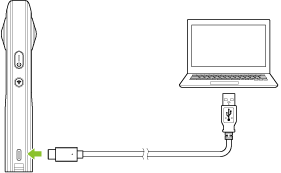
The power lamp lights green.
If the battery is charged while the power of the camera is on, charging time is longer. It is recommended to charge the battery while the power of the camera is off.
The power lamp lights blue when charging is complete while the power of the camera is on. The power lamp turns off when charging is complete while the power of the camera is off or the camera is in the sleep mode.
When the power of the camera is off, charging takes approx. 170 minutes (at an ambient temperature of 25°C (77°F)).
2. Remove the USB cable.
Caution
- Use the provided USB cable for charging. When a USB cable other than the provided USB cable is used, it may take time for the battery to charge, or charging or data communication may not be possible.
- Connect the USB cable directly to a USB port on the computer. When connected via a USB hub, charging may not be possible.
- When charging the battery, be sure to connect and remove the USB cable while the power of the computer is on. If the computer is restarted while the USB cable is connected, the computer may not recognize the camera.
Note
- The battery level can be checked on the OLED panel.
- The charging time described above is a guide for full charging. The charging time varies according to the remaining battery level.
- If the remaining battery level is low, it may take time for the camera to be recognized by the computer.
- When turning the camera on without using the battery, it is recommended to use the AC Adapter Kit K-AC166 (sold separately; the model name varies depending on the country).
- The battery of the camera can be charged using a commercially available USB-PD compatible charging adapter. However, operation with all USB-PD devices is not guaranteed.
- If the AC adapter output is insufficient, the message [Invalid Power Supply] is displayed on the OLED panel.
Turning the Power On/Off
When charging of the battery is complete, turn on the power of the camera.
1. Press the power button.
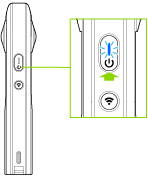
The OLED panel turns on.
When the button is pressed while the power is off: Turns the power on.
When the button is pressed while the power is on: Puts the camera to the sleep mode.
When the button is pressed in the sleep mode: Cancels the sleep mode.
When the button is pressed and held for 2 seconds while the power is on: Turns the power off.
When the button is pressed and held for 7 seconds while the power is on: Turns the power off forcibly.
The power status can be checked with the power lamp.
Names of Camera Parts: Power lamp
Link your smartphone and camera with the RICOH360 app
By connecting your smartphone to your camera, you can control your camera from your smartphone.
1. Turn on the camera.
2. If the access point mode icon is notanimated on the camera display panel, press the wireless button.
3. Open the RICOH360 app and log in.
4. Tap the THETA List icon displayed at the bottom ofthe screen.

5. Tap New Camera.
6. Tap RICOH360 THETA A1.


7. When “RICOH THETA has been discovered” isdisplayed, tap Next.
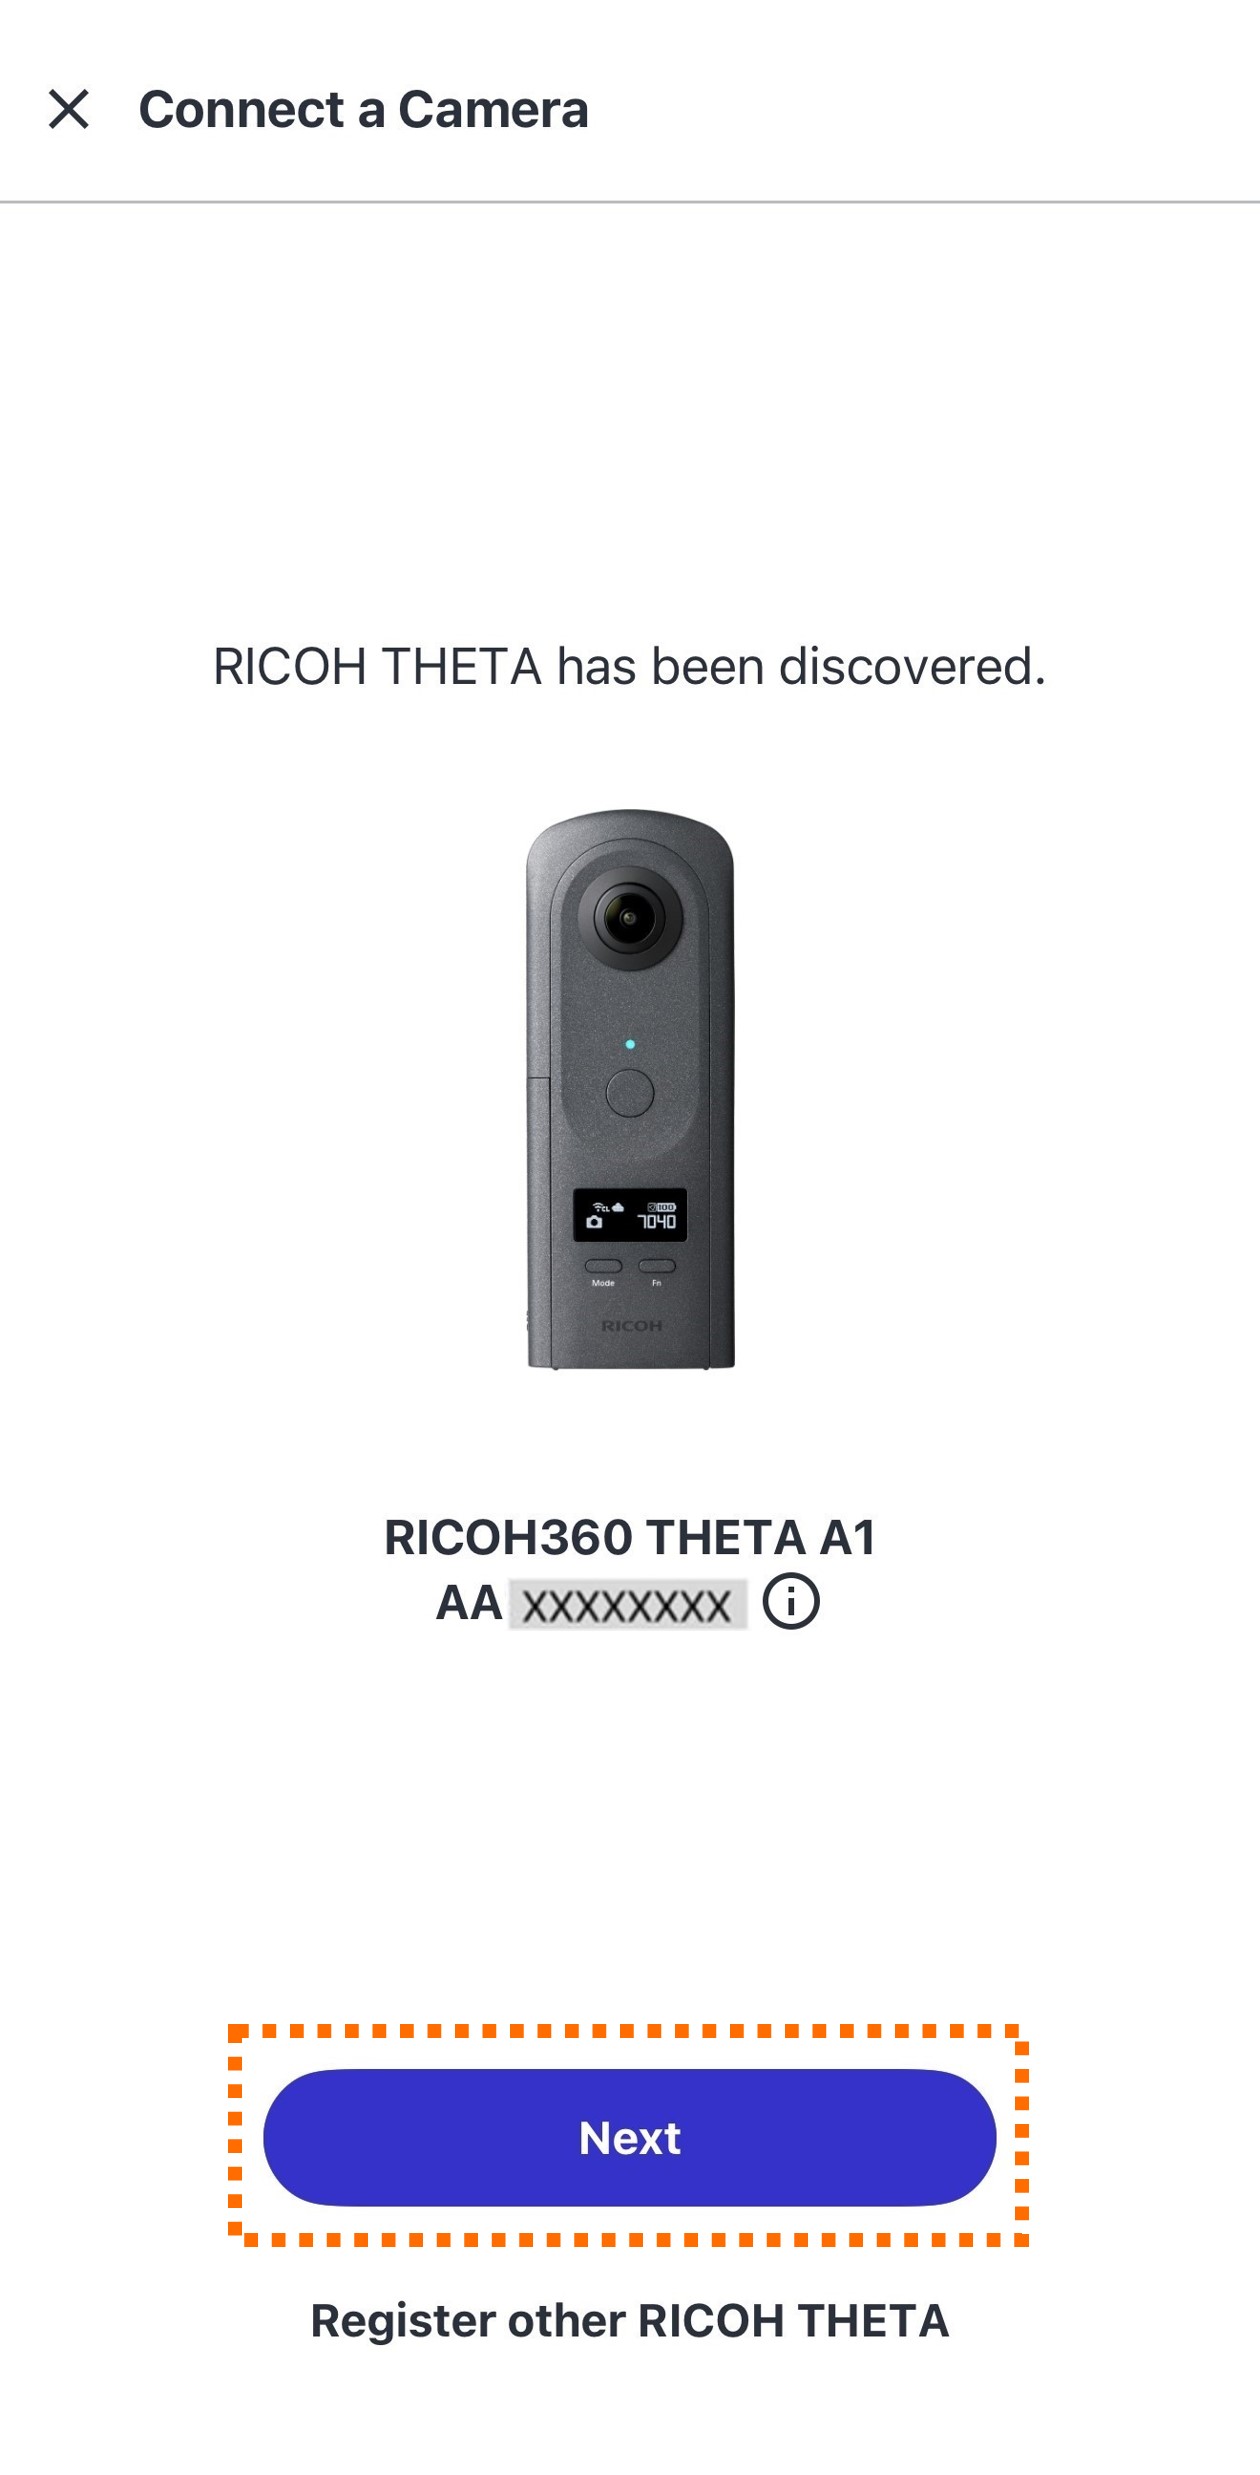
8. Enter your Password and tap Connect.

9. When the dialog box appears, tap Join and wait for a moment.

When the following screen appears, thecamera and smartphone have been linked.
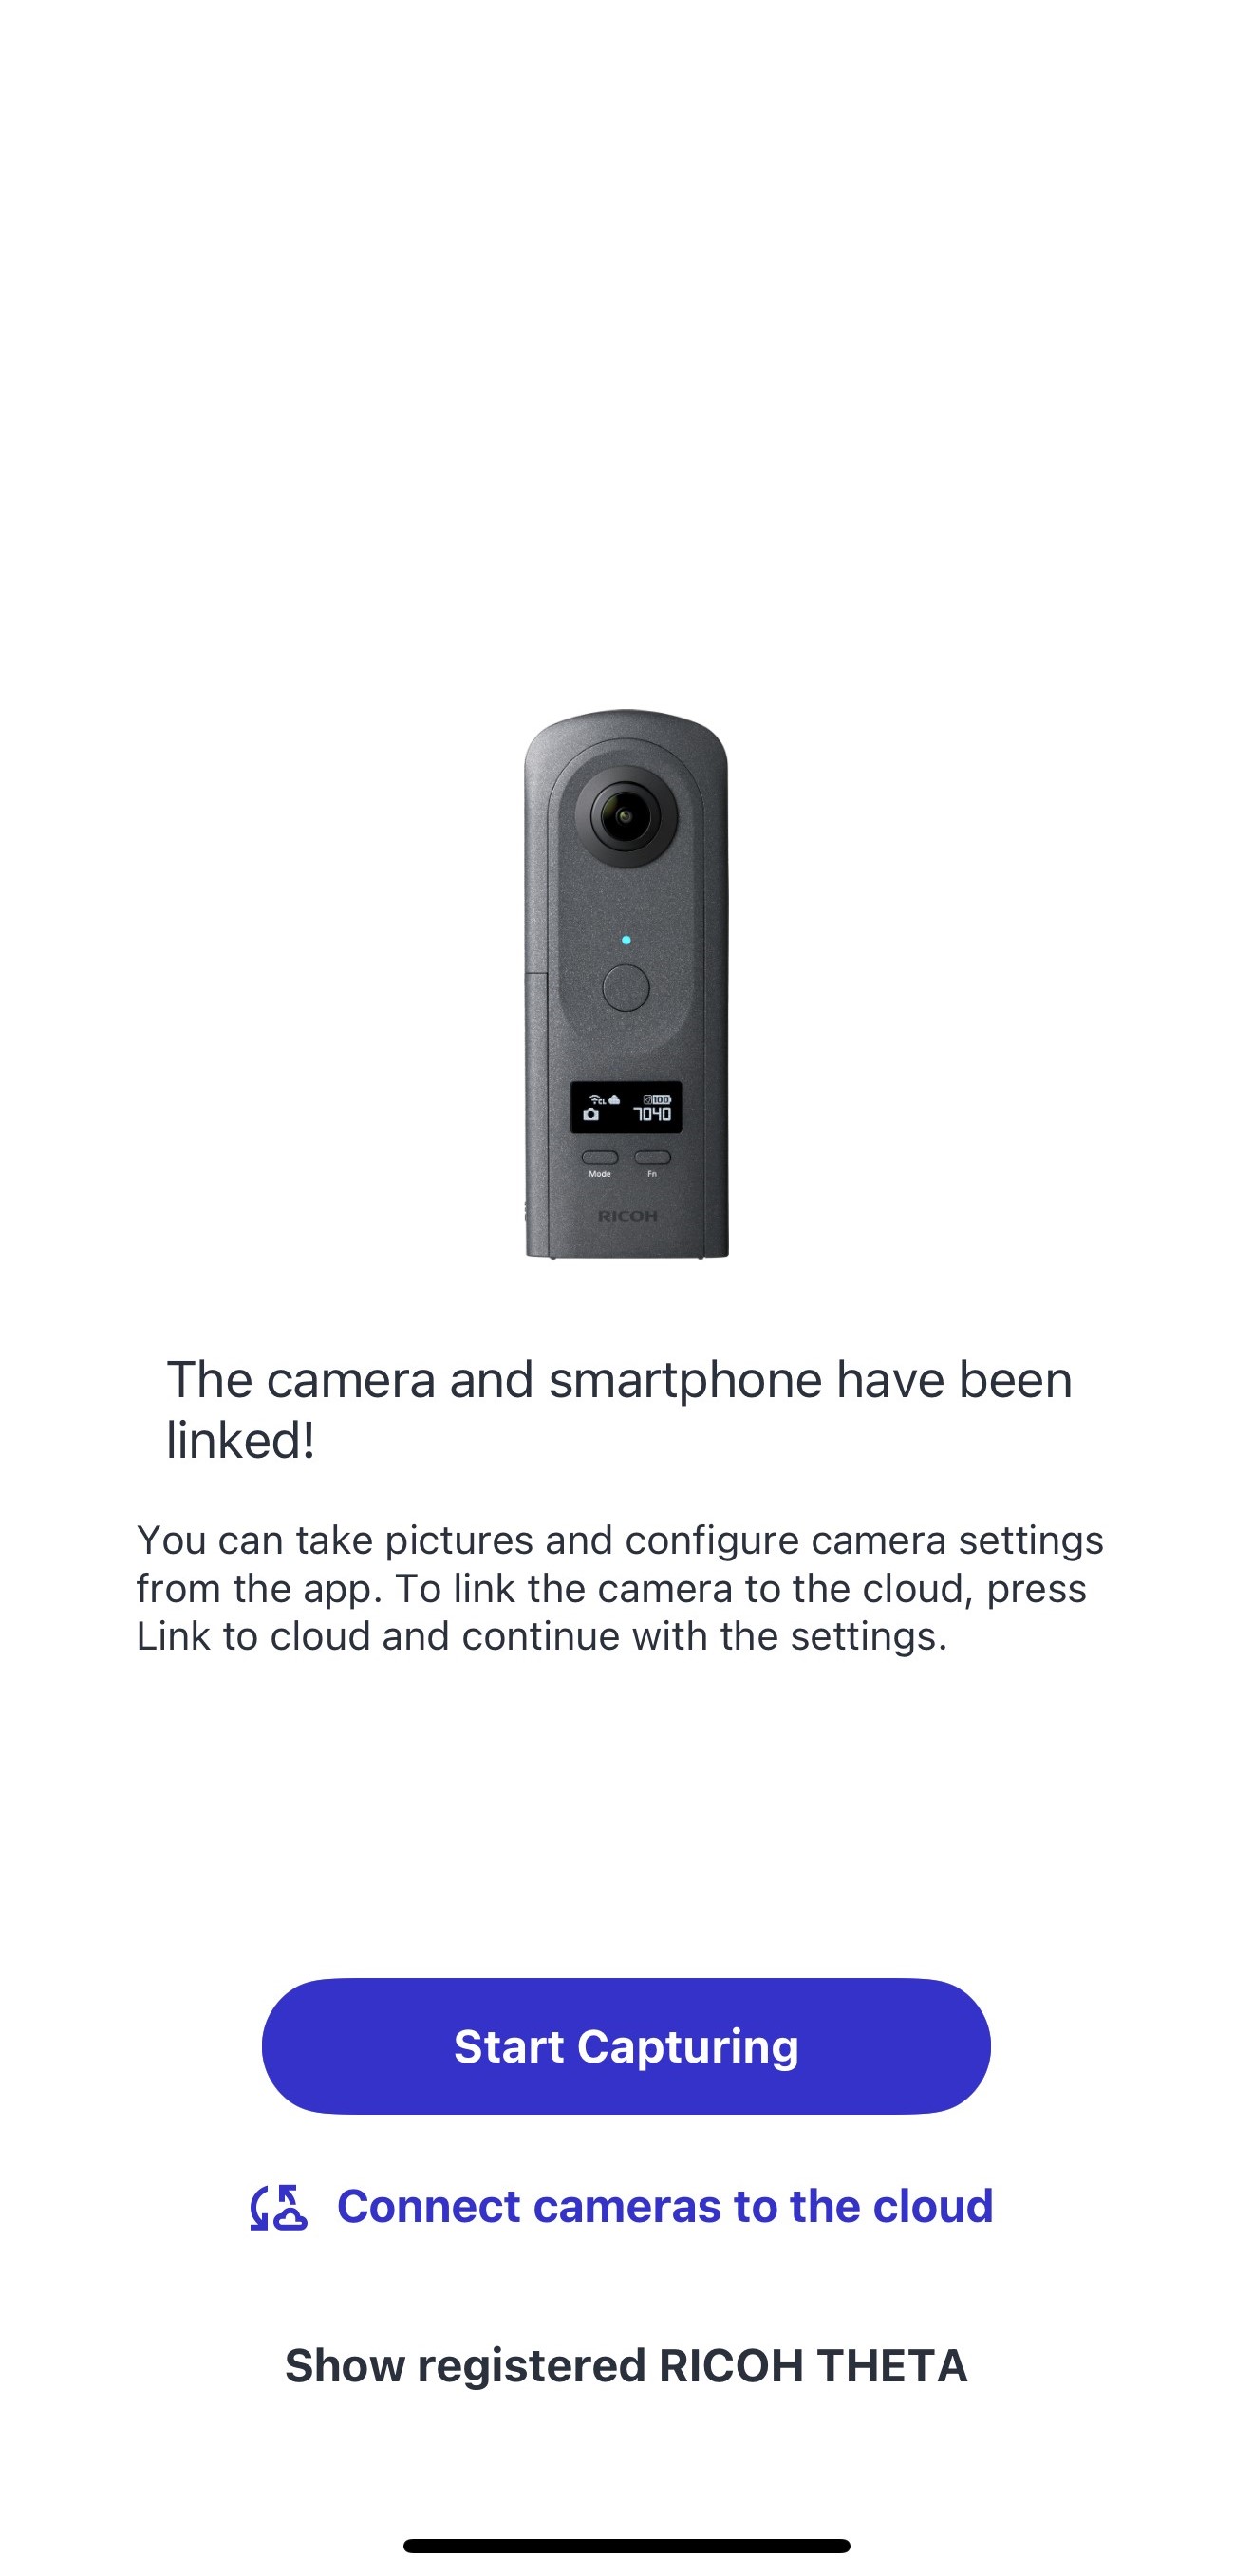
To take a photo with the linked camera, tap Start Capturing.
For instructions on how to take photos, see here.
The following settings enable automaticuploads to the RICOH360 Cloud.
Unregistering the Camera from the Smartphone
This operation cannot be performed while the smartphone is connected to THETA.
1. Start the RICOH360 app.
2. Tap [THETA List] at the bottom of the screen.
3. Select the camera you want to unregister from the camera list.
4. Tap the trash can icon in the upper right corner.

5. Tap [Delete].
