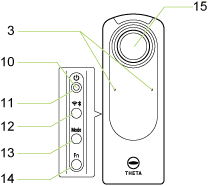
Names of Camera Parts
This section explains the names and functions of the buttons, lamps, etc. on the camera.


1. Speaker
2. Rear lens / 15. Front lens
Caution
Be careful when handling the lens section to avoid damage.
3. Microphone
Four microphones are incorporated in the camera.
4. Shutter button
Press to capture images.
5. Camera status lamp
Indicates the camera status.
Lit in blue
The camera is ready for shooting.
Flashing in blue
The camera is starting up (when the lamp flashes slowly).File conversion is progressing (when the lamp flashes rapidly).
Lit in white
The plug-in installed in the camera is running.
Flashing in red
An error has occurred in the camera. The lamp also flashes during the the power-off process of the camera.
Lit in green
The self-timer function can be used for shooting.
Unlit
Shooting is not possible as the camera is in the sleep mode, no more images can be captured, or no more recordable time remains. The lamp is also unlit in the light/sound off mode or during shooting.
6. OLED panel
Displays the shooting information, battery level, etc.
7. USB terminal (USB Type-C)
Used to connect the camera to a computer via the provided USB cable. (Details)
Caution
It may take time for the battery to charge or the battery may not charge at all when a USB cable other than the provided USB cable is used.
8. Strap lug
9. Tripod mount hole
Caution
When using the tripod, take care not to overtighten the screw.
10. Power lamp
Indicates the power status. (Details)
11. Power button
Turns the power on and off when the button is pressed and held.
Starts and cancels the sleep mode when the button is pressed briefly.
12. Wireless button
Switches the wireless LAN mode between “Access point mode” (direct connection to a smartphone), “Client mode” (connection to a smartphone via a wireless router), and “Off”. (Switching to the “Client mode” is possible only when the router settings have been made.) (Details)
Turns the Bluetooth® function on and off when the button is pressed and held. (Details)
13. Mode button
Switches among the still image capture mode, video mode, and live streaming mode. (Switching to the live streaming mode is possible only when the USB cable is connected.)
Runs and terminates the installed plug-ins when pressed and held. (Details)
14. Fn button
Switches the shooting method between “Normal shooting” and “Self-timer shooting”. When “My Settings” have been registered in the camera with the basic app, the shooting method can also be switched to “My Settings shooting”.
Switches the information displayed on the OLED panel between “Basic display” and “Shooting information display” when the button is pressed and held.
Information Displayed on the OLED Panel
Basic display

1. Communication status

Bluetooth® function set to on

Remote Control TR-1 connected


Wireless LAN function set to on in the access point mode


Wireless LAN function set to on in the client mode
2. Shooting mode / Shooting mode option

Still image shooting mode


Self-timer shooting function set to on in the still image shooting mode


My Settings shooting function set to on in the still image shooting mode


My Settings shooting function set to on in the still image shooting mode (with shooting conditions changed)


During the interval shooting in the still image shooting mode


During the interval composite shooting in the still image shooting mode


During the multi-bracketing shooting in the still image shooting mode

Video shooting mode


Self-timer shooting function set to on in the video shooting mode


My Settings shooting function set to on in the video shooting mode


My Settings shooting function set to on in the video shooting mode (with shooting conditions changed)


During video recording

Live streaming mode


During live streaming
3. Cloud connection status after connecting with the RICOH360 app

The camera is in the access point mode or not connected to ricoh360.com. (There are images in the camera waiting to be uploaded.)

The camera is in the access point mode or not connected to ricoh360.com. (There are no images in the camera waiting to be uploaded.)

The camera is connected to ricoh360.com in the client mode and on standby. (There are no images in the camera waiting to be uploaded.)

The camera is connected to ricoh360.com in the client mode and uploading images.

The camera is connected to ricoh360.com in the client mode and on standby. (The cloud storage capacity for the account used has reached its limit and there are images in the camera waiting to be uploaded.)
4. Plug-in/Electromagnetic compass status

Plug-in running

Electromagnetic compass error
5. Battery level / Error notification

~

Battery level (100% to 0%)

Charging

Battery temperature error

Camera unit temperature error
6. Number of recordable still images / Video recordable time / Self-timer countdown / Memory warning notification / Other information

Memory capacity warning

Battery level warning

Other errors
Shooting information display

1. Shooting mode / Shooting mode option

Still image shooting mode

Video shooting mode

During video shooting in the video shooting mode

Live streaming mode
2. Error notification

Camera unit temperature error

Electromagnetic compass error
3. Exposure mode
[Auto]: Auto mode
[Av]: Aperture priority mode
[Tv]: Shutter speed priority mode
[ISO]: ISO sensitivity priority mode
[M]: Manual mode
