Setting the Battery
Set the provided rechargeable battery to the camera.
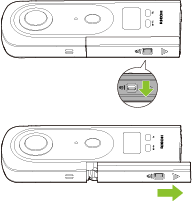
1. Slide the lock lever on the battery cover in the direction of the arrow to release the lock, and then slide the battery cover in the direction of the arrow to open it.
When the lock is released, you can see the yellow indicator.
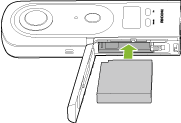
2. Check that the orientation of the battery is correct, and insert it all the way while pushing the latch sideways.
To remove the battery, slide the latch.
3. Close the battery cover and slide the lock lever to lock the cover.
Caution
- When opening or closing the battery cover, be sure to remove any water, sand, or other dirt from the camera and avoid places where dirt can easily get in.
- Close the battery cover securely. Otherwise, water or dust may get inside the camera.
- When inserting or removing the battery, make sure that the power of the camera is off.
- Do not insert or remove the battery while power is supplied to the camera via the AC adapter.
Charging the battery
Charge the battery before using the camera.
1. Connect the camera to a computer with the provided USB cable.
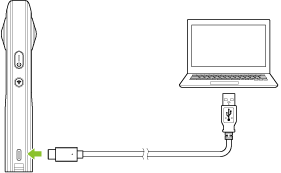
The power lamp lights green.
If the battery is charged while the power of the camera is on, charging time is longer. It is recommended to charge the battery while the power of the camera is off.
The power lamp lights blue when charging is complete while the power of the camera is on. The power lamp turns off when charging is complete while the power of the camera is off or the camera is in the sleep mode.
When the power of the camera is off, charging takes approx. 170 minutes (at an ambient temperature of 25°C (77°F)).
2. Remove the USB cable.
Caution
- Use the provided USB cable for charging. When a USB cable other than the provided USB cable is used, it may take time for the battery to charge, or charging or data communication may not be possible.
- Connect the USB cable directly to a USB port on the computer. When connected via a USB hub, charging may not be possible.
- When charging the battery, be sure to connect and remove the USB cable while the power of the computer is on. If the computer is restarted while the USB cable is connected, the computer may not recognize the camera.
Note
- The battery level can be checked on the OLED panel.
- The charging time described above is a guide for full charging. The charging time varies according to the remaining battery level.
- If the remaining battery level is low, it may take time for the camera to be recognized by the computer.
- When turning the camera on without using the battery, it is recommended to use the AC Adapter Kit K-AC166 (sold separately; the model name varies depending on the country).
- The battery of the camera can be charged using a commercially available USB-PD compatible charging adapter. However, operation with all USB-PD devices is not guaranteed.
- If the AC adapter output is insufficient, the message [Invalid Power Supply] is displayed on the OLED panel.